


Keyboard Sticker Training
Instructions for applying our Keyboard Stickers on Keyboards/ Laptops
Way 1 – The most safe and easy way
Beginners please only use this way of applying
Surface Preparation
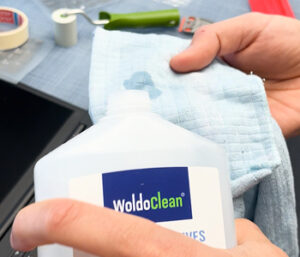 |
| Apply a small amount of isopropanol (99.9% alcohol) to a lint-free cloth. |
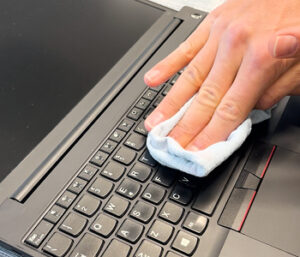 |
Carefully clean the entire keyboard surface to remove dust, grease, and dirt. Afterwards, wipe the keyboard surface dry with a clean, dry, and also lint-free cloth. Important: After cleaning, the isopropanol must be completely evaporated before applying the stickers. Also wipe once across both sides of the sticker to remove any dust or particles that may be attached, as these could otherwise settle on the keys. |
Positioning the Sticker
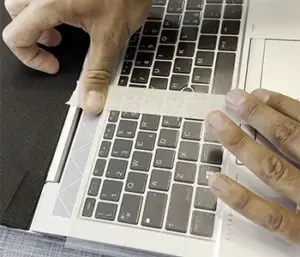 |
Place a strip of masking tape vertically across the center of the keyboard so that it extends beyond the keyboard on both the top and bottom. Position the keyboard sticker precisely on the keyboard and fix the tape above and below the keyboard to hold the sticker securely in place. Tip: If it is difficult to align the sticker, use a few small pieces of masking tape on the corners first. Once the sticker is perfectly aligned, apply the center strip of tape. Remove the corner pieces of tape before you start applying the sticker. |
Applying the Stickers
| Before continuing, place a simple piece of masking tape under the area where the model name will sit, or cut off the model name with scissors. |
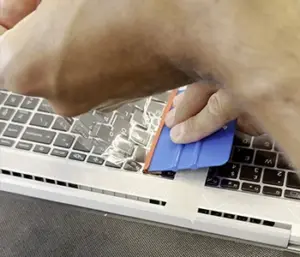 |
Now fold the sticker on one side upward and carefully cut the lower backing film from the transfer film. (see video!) Use our black pressure roller or a squeegee with a felt or fabric edge. Start in the center and slowly roll or squeegee the sticker onto the keyboard, working first towards the left side (you can also start with the right side if you prefer). Once the first half is fully applied, carefully lift the remaining loose half, remove the rest of the backing liner, and repeat the same process on the other side. Work slowly and apply even pressure—just enough to ensure good adhesion without stretching the sticker. When the entire sticker has been applied, go over all keys one more time with the pressure roller or squeegee to achieve the best possible bond. |
Removing the Transfer Film
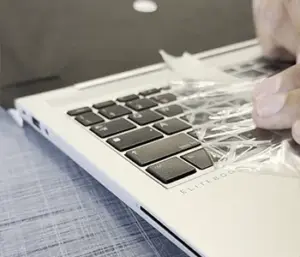 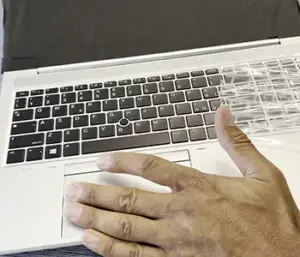 |
If you are right-handed, start at the top left and slowly peel off the transfer film. Hold the transfer film with one hand and pull it off at a very shallow angle. With the other hand, use a squeegee to keep the stickers fixed in place while peeling. |
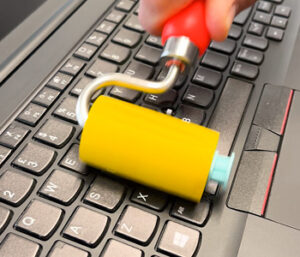 |
| After removing the transfer film, roll once more over the entire keyboard with a soft pressure roller, followed by a second pass with a slightly firmer roller and slightly more pressure. |
Air Bubbles?
⸻
Small air bubbles can be gently pushed out with light pressure immediately after application.
Alternatively, we recommend using a “Bubble Pen”: simply puncture one of the outer edges of the bubble with a fine point and guide or press the air out toward that opening from all sides.
⸻
Important Information
- Keep the working environment at a normal temperature: 18–22 °C (+/–)
- Store the stickers at room temperature and in a dry place.
- All keys are slightly reduced on all sides. Therefore, center the film both vertically and horizontally.
- Color matching is calibrated under 1200 lx (average value for “normal” lighting conditions). Under certain lighting conditions, the color of the stickers may differ slightly from the keyboard color. Please note that different materials may absorb or reflect light differently, which can also cause slight visual differences.
- Some silver Dell models have problems with surface coating. Please use masking tape wherever the keyboard sticker will touch the surface!
See video below!
Way 2 – For practiced users
Make applying faster
Surface Preparation
|
| Apply a small amount of isopropanol (99.9% alcohol) to a lint-free cloth. |
|
Carefully clean the entire keyboard surface to remove dust, grease, and dirt. Afterwards, wipe the keyboard surface dry with a clean, dry, and also lint-free cloth. Important: After cleaning, the isopropanol must be completely evaporated before applying the stickers. Also wipe once across both sides of the sticker to remove any dust or particles that may be attached, as these could otherwise settle on the keys. |
Positioning the Sticker
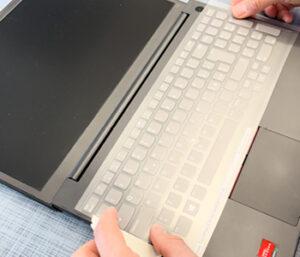 |
| Place the sticker precisely on the keyboard. Then fix the left side of the sticker with a piece of masking tape so that it cannot shift during application. |
Applying the Stickers
| Before continuing, place a simple piece of masking tape under the area where the model name will sit, or cut off the model name with scissors. |
 |
| Now fold the sticker upward and carefully separate the lower backing film from the transfer film. |
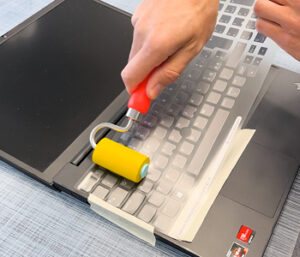 |
| Press the stickers evenly onto the keyboard from left to right using a soft foam roller. Work slowly and apply pressure (but only enough so that the sticker does not stretch) so that the stickers settle cleanly onto the surface. Then go over all keys once more using the firmer pressure roller. |
Removing the Transfer Film
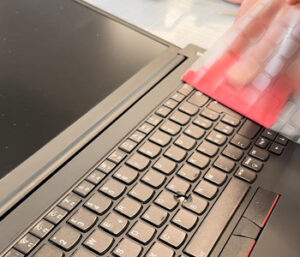 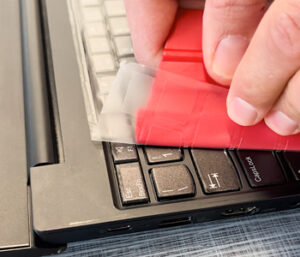 |
If you are right-handed, start at the top left and slowly peel off the transfer film. Hold the transfer film with one hand and pull it off at a very shallow angle. With the other hand, use a squeegee to keep the stickers fixed in place while peeling. |
|
| After removing the transfer film, roll once more over the entire keyboard with a soft pressure roller, followed by a second pass with a slightly firmer roller and slightly more pressure. |
Air Bubbles?
⸻
Small air bubbles can be gently pushed out with light pressure immediately after application.
Alternatively, we recommend using a “Bubble Pen”: simply puncture one of the outer edges of the bubble with a fine point and guide or press the air out toward that opening from all sides.
⸻
Important Information
- Keep the working environment at a normal temperature: 18–22 °C (+/–)
- Store the stickers at room temperature and in a dry place.
- All keys are slightly reduced on all sides. Therefore, center the film both vertically and horizontally.
- Color matching is calibrated under 1200 lx (average value for “normal” lighting conditions). Under certain lighting conditions, the color of the stickers may differ slightly from the keyboard color. Please note that different materials may absorb or reflect light differently, which can also cause slight visual differences.
- Some silver Dell models have problems with surface coating. Please use masking tape wherever the keyboard sticker will touch the surface!
See video below!
Need Help?
Don’t hesitate to contact us via WhatsApp to get personal support!